Various website animation effects are really important: thanks to them, any online resource becomes more lively, intriguing, eye-catching... which leads to a great increase in conversions. But how to make animations? Is it really so difficult?
The answer is yes, but don't you worry! We decided to share with you our experience. Read the article to find the simplest way to create your own animations with Pixi.JS.
Technologies to create web animations
Our company often creates beautifully animated concepts for the Dribbble site. These so-called dribbble shots can inspire everyone who wants to make his online resource or mobile app brighter and more appealing.
But we decided to go even further and not be limited to just an animated picture. We wanted to bring the brightest dribbble shots to life, to make them real.
Of course, there are many different technologies to create animation for websites, we’ve just chosen the ones which seemed to be most effective in our particular case.

What is Pixi.JS?
Before proceeding to the description of how we implemented animated website design concepts, we'd like to say a few words about the Pixi JS graphics.
Pixi JS is a wonderful library offering a fast and simple rendering engine. It’s able to work in combination with a number of other gaming libraries in javascript.
Pixi.js allows using the WebGL capabilities for rendering 2D scenes and can independently determine whether WebGL support is available; if necessary, the library switches between rendering methods.
The developers of Pixi.js position their creation as a 2D analog of Three.js. The next question is when and how to use it? Well, the first thing that comes to mind is, of course, games. However, according to the authors of Pixi.js, their engine is quite low-level and can be used everywhere where rich 2D animation is required, including web interfaces.
And now it's time to take a closer look at the Pixi js examples - or, rather, how we used the library to create web animations.
#1 Animated menu appearance
To begin with, pay attention to the concept below created by Agilie designers.
There are many impressive website animation examples on the dribbble resource, and the above one is undoubtedly one of them. We really like how categories appear and disappear, and that's why we decided to put the shot into practice.
We've done so, and now we're happy to describe the whole process, from A to Z.
Let’s get started!
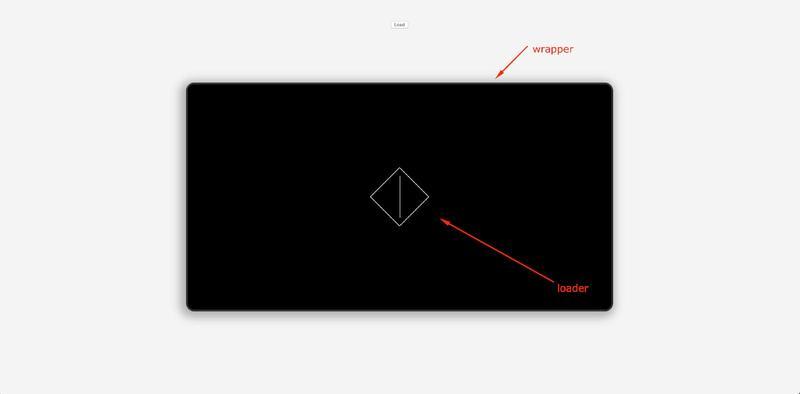
Initially, we should create the first animation of the square with the line inside. Let's call it loader [1-1 HTML, 1-2 browser, 1-3 styles].
-
HTML 1-1
<body>

  <div class="wrapper">

    <!--  loader start  -->

    <div class="loader" id="js-loader">

      <div class="loader__cube" id="js-loader-cube"></div>

      <div class="loader__line" id="js-loader-line"></div>

    </div>

    <!--  loader end  -->

</div>

</body>-
style 1-3
body {

  display: flex;

  align-items: center;

  justify-content: center;

  margin: 0;

  font-family: 'Noto Sans HK', sans-serif;

  font-weight: 400;

  color: #fff;

  background: #f4f4f4;

}

.wrapper {

  position: relative;

  overflow: hidden;

  width: 100%;

  max-width: 1024px;

  height: 550px;

  border-radius: 20px;

  border: 4px solid rgba(57, 54, 56, 1);

  background: #000;

  box-shadow: -5px 5px 20px 10px rgba(0, 0, 0, .3);

}

.loader {

  position: absolute;

  z-index: 2;

  opacity: 1;

  top: 50%;

  left: 50%;

  transform: translate(-50%, -50%);

  width: 100px;

  height: 100px;


  &__cube {

    width: 100%;

    height: 100%;

    transform: rotate(45deg);

    border: 1px solid #ffffff;

  }

  &__line {

    position: absolute;

    top: 0;

    height: 100px;

    left: 50%;

    transform: translateX(calc(-50% + 1px));

    width: 1px;

    background: #ffffff;

  }

}
Now that we’ve drawn a square with a line, we’re ready to connect Gsap using the CDN.
<script src = "https://cdnjs.cloudflare.com/ajax/libs/gsap/2.1.2/TweenMax.min.js"> </ script >.Gsap helps to easily manage web design animation [1-4 js].
-
js 1-4
function animLoader() {

  const tl = new TimelineMax();


  tl

    .to(loaderCube, 1.5, {ease: Power2.easeInOut, rotation: '+= 450', transformOrigin:"center center"})

    .to(loaderLine, 1.5, {ease: Power0.easeNone, height: 0}, 0)

    .to(loader, 1, {opacity: 0}, 1.4)

    .to(loader, 1, {zIndex: -1}, 3);

}
Let's write a function, which will rotate the square by 450 degrees and change the value of the height line from 100% to 0% in 1 second. Then, with a delay of 1.4 seconds, we'll hide our loader by pointing it to opacity = 0.
The second part of the web design animation in question is to create the illusion that the curtain moves away to the right, after which the category name first appears, and then the category background do the same.
To implement the idea, we conditionally build 4 layers:
-
the first layer is the category background;
-
the second layer is a black curtain;
-
the third layer is the category name;
-
the fourth layer is a black curtain (a black rectangle covering the entire area of the category).
So, first, we’ll move the left edge of the 4th layer from the left 0% position to the left 100% position for 1 second. It’ll allow us to gradually open the category name. Then, with a slight delay, we'll move the 2nd layer (second curtain) to make the animation effect we want [js 1-6].
-
js 1-6
function animSections() {

  const tl = new TimelineMax();


  sectionsLine.forEach((line) => {

    const animTime = 0.1 * (Math.floor(Math.random() * (10 - 4) + 4));

    tl

      .to(line, animTime, {ease: Power1.easeIn, top: 0}, 1)

      .to(line, 1, {width: 0}, 3)

  });

  titlesOverlay.forEach((title) => {

    tl.to(title, 1, {ease: Power1.easeIn, left: '100%'}, 2)

  });

  sectionsOverlay.forEach((section) => {

    tl.to(section, 1, {ease: Power1.easeInOut, left: '100%'}, 2.5)

  });

}
Also, let's add a drawing of vertical lines before the appearance of categories and make them move at different speeds. For this, we'll randomly set the time [from 0 to 1 second], during which they should rise up (as the above code and video below show).
Now we’ll make a gradual disappearance of categories when clicking on them. To achieve such a result, we have to set overflow: hidden in our wrapper and move the categories upwards, gradually adding opacity: 0 with a slight delay. To make the created animated website design look more like the original, we need to add a random delay for each category, and therefore they won't disappear at the same time [js 1-8].
-
js 1-8
function animImages() {

  const tl = new TimelineMax();


  Array.prototype.forEach.call(sectionsNode, function (section) {

    const sectionHeight = section.offsetHeight;

    const animDelay = ((Math.floor(Math.random() * (10 - 4) + 4)) * 0.1);


    tl

      .to(section, 1, {ease: Power2.easeInOut, top: `-=${sectionHeight}`}, animDelay)

      .to(section, 0.5, {opacity: 0}, (animDelay + 0.1));

  });


}
Well, that's all, the implementation of the first dribbble shot is over. To see what we’ve achieved, click the link.

And we should move on to the following website animation examples.
#2 Animated scroll effects
The concept below brought us to the idea of using a similar effect to create an animated scroll to top or down (while scrolling the mouse wheel).
We offer to look at what needs to be done in order to embody the idea.
Let's start by creating some basic markup to make sure everything looks the way it does on a shot. Then we connect the necessary libraries via CDN (Pixi, Gsap, PubSub).
In fact, the example of animated graphics for websites (the one under consideration) is aimed to perform the following manipulations:
-
when scrolling down, we turn the block with a picture clockwise (at the same time replacing the image) and lower the header;
-
when scrolling up, we turn the block with a picture counterclockwise and lift up the header.
To do this, let’s create a basic setting for the Pixi library:
-
first, we have to initialize Pixi, create containers for our images, and add them to the stage [js 2-1, js 2-2 (the 1st part)]:
js 2-1

// PIXI INIT STAGE

let renderer = PIXI.autoDetectRenderer(canvasWidth, canvasHeight, {backgroundColor : 0x1099bb, antialias: true});

canvasWrap.appendChild(renderer.view);


let loader = PIXI.loader;

// create the root of the scene graph

let stage = new PIXI.Container();


let container = new PIXI.Container();

let container2= new PIXI.Container();-
now it’s time to load pictures. Doing so, be sure to add them to the appropriate containers, otherwise, they won’t appear [js 2-2]:
js 2-2
loader

.add('a', 'images/1.jpg')

.add('b', 'images/2.png');

loader.load((loader, resources) => {

console.log('all images was load');


Object.keys(resources).forEach(function(key,index) {

textures.push(resources[key].texture);

});


// OLD IMAGE

current = new PIXI.Sprite(textures[0]);

// set to the image Cover size effect

let winprop = canvasWidth / canvasHeight;

let imageprop = current.width / current.height;


if (winprop > imageprop) {

current.width = canvasWidth;

current.height = canvasWidth / imageprop;

} else {

current.height = canvasHeight;

current.width = canvasHeight * imageprop;

}

current.anchor.x = 0.5;

current.anchor.y = 0.5;


// NEW IMAGE

next = new PIXI.Sprite(textures[1]);

imageprop = next.width / next.height;


if (winprop > imageprop) {

next.width = canvasWidth;

next.height = canvasWidth / imageprop;

} else {

next.height = canvasHeight;

next.width = canvasHeight * imageprop;

}

next.anchor.x = 0.5;

next.anchor.y = 0.5;


next.rotation = Math.PI; // rotate next image to 180 deg


container.addChild(next);

container2.addChild(current);


stage.addChild(container);

stage.addChild(container2);


renderer.render(stage);

});-
now we are supplementing images with a cover effect to make them look better on our canvas (as the above code shows).
-
the second picture (which is behind) should be rotated 180 degrees (according to our dribble concept, the main container rotates clockwise and counterclockwise, and the second image moves left or right. And in order for it to appear correctly, you need to turn it over initially). Also, take a look at the code [js 2-2].
Now we have to generate the 'gotoSlide' event (using PubSub.js) and subscribe to it. And in the event, we implement animated scroll effects [js 2-3].
To make an animation, you have to take the following steps:
-
turn our main stage 180 degrees clockwise while scrolling down. To determine which way the user scrolls, you need to write the code: `let direction = e.deltaY > 0 ? 1 : -1;` where "e" is an object passed to the function when scrolling. If the user scrolls down, the direction is "1", otherwise, the direction is "-1".
js 2-3
window.addEventListener('wheel', function (e) {

console.log(activeSlide);

if (!canGo) return;

let direction = e.deltaY > 0 ? 1 : -1;

if ((activeSlide + direction) < 1 || (activeSlide + direction) > 2) return;

canGo = false;

PubSub.publish( 'gotoSlide', {from: activeSlide, to: (activeSlide + direction), direction: direction} );

activeSlide = (activeSlide + direction);

setTimeout(function () {

canGo = true;

console.log('you can scroll again');

}, delay)

});

PubSub.subscribe('gotoSlide', function (msg, data) {

console.log(msg, data);


if (data.direction === 1) {

moveForward(current, next);

draw();

} else {

moveBack(current, next);

draw();

}

});-
add the disappearance of the first picture on the left and the appearance of the second image on the right (when scrolling down);
-
add the disappearance of the second picture on the right and the appearance of the first image on the left (when scrolling up);
-
add scrolls to our headers: offset along the Y-axis by the header value (up/down depending on the scroll direction).
What's more, we add a delay interval during which the user cannot scroll (and therefore pictures won't change each other too quickly).
Do you want to know what we got in the end? Visit this page (and don't forget to scroll the mouse wheel up and down to see the working effect).

And the following example completes our discussion of the process of implementation of complicated website animation effects.
#3 Two in one: effective loading + ripples
Inspired by this site (we liked the impressive appearance of the images), we decided to implement something similar. Besides, we added a ripple effect, which occurs when you hover the mouse over the picture.
And again, as in the previous example, we start by marking up and creating 4 main sections. Each of them contains a block for future images, as well as a block with text.
Let's make them change places:
-
first section: the picture is on the left, the text is on the right;
-
second section: vice versa.
And don’t forget to connect Pixi and Gsap via CDN.
Now we need to make the ImageLoader class. Its task is to take an element and create a canvas object named PIXI.Application. And this PIXI.Application will be passed to the element which was previously taken.
In addition, we need to create a Load method, which will allow us to add images to Pixi only after they are loaded.
As you remember, we have two website animation effects, and the first one (which occurs when loading a picture) should be created as follows:
-
creating displacementSprite using PIXI.Sprite.fromImage () (a method which takes an image). By the by, the so-called 'perlin noise' pictures are best suited.
-
forming a filter in which the created sprite is being passed.
-
setting the scale for the filter.
-
adding a filter on the stage.
To visualize the effect in the initial state, you need to set the scale of the specified value on the filter (let the value be 700, for example). When you click/load the page, set the scale to 1.
That’s all to it! It wasn’t too difficult, was it? In any case, the game is worth the candle, for the result is quite impressive. Perhaps, such a spectacular appearance of an image is almost the best intro animation, do you agree?
Now we’re ready to implement the second effect (ripples). The process is as simple as possible; all you have to do is add a small displacement of your 'displacementSprite' to the pictures (displacement should occur at the Hover event).
-
js
    // create filter

    this.displacementSprite = PIXI.Sprite.fromImage('images/displacement-img01.jpg');

    this.displacementSprite.texture.baseTexture.wrapMode = PIXI.WRAP_MODES.REPEAT; // cover with filter all image

    this.displacementFilter = new PIXI.filters.DisplacementFilter(this.displacementSprite);

    // set filter scale

    this.displacementFilter.scale.set(1e4 + Math.random()*1000);

    this.displacementSprite.scale.set(0.4 + 0.6*Math.random());

    // add filter to container & stage (for waves effect on hover)

    this.app.stage.addChild(this.displacementSprite);

    this.container.filters = [this.displacementFilter];


    // animate displacementFilter on image

    let tl = new TimelineMax({onComplete:function() {that.animated = true;}});

    tl.to(that.displacementFilter.scale,1,{x:1,y:1});


  hover() {

    let that = this;


    this.wrapper.addEventListener('mouseenter',function() {

      if(!that.mouseOn && that.animated) {

        that.mouseOn = true;

        TweenMax.ticker.addEventListener('tick',that.doWaves, that); // same as requestAnimationFrame

        let tl = new TimelineMax();

        tl.to(that.displacementFilter.scale,0.5,{x:16,y:4});

      }

    });


    this.wrapper.addEventListener('mouseleave',function() {

      if(that.mouseOn && that.animated) {

        that.mouseOn = false;

        TweenMax.ticker.removeEventListener('tick',that.doWaves, that);

        let tl = new TimelineMax();

        tl.to(that.displacementFilter.scale,0.5,{x:1,y:1});

      }

    });

  }
Follow the link to see the result of our efforts.
Website Design Services by Agilie
As you see, we know how to create web animations, and trendy ones. And we’d be happy to develop you an online resource with a complex animated interface.