The task of choosing the best database solutions when developing a mobile application is much more important than it might seem at first glance. And its importance is caused, among other things, by business objectives either.
The fact is that the app operation is associated with the performance of certain data manipulations, such as saving, filtering, loading, searching, etc. And you should admit, all these processes are crucial for both the developer and the entrepreneur, as the program's effectiveness depends on them.
If we’re talking about creating iOS applications, then developers can use the built-in Core Data framework to perform the above data operations. However, CoreData is only one of the possible online database solutions. Today, there are a number of third-party frameworks allowing you to do the same. Among them is a very popular Realm database.
But what to choose, Core Data or Realm? That's a big question, no doubt! And we'll do our best to figure it out.
So, if you’re planning to build an iOS application and want it to work as productively as possible, pay attention to our article. We’re sharing our own expertise and explaining how to select a good and reliable open-source database. Also, we'll compare the advantages and disadvantages of CoreData and Realm using our practical experience.
CoreData database review
CoreData is a powerful and flexible iOS framework, which allows storing data in applications and devices. Working with such programming languages as Objective-C and Swift, it remains in high demand among iOS developers.
CoreData History
The CoreData framework was created on the basis of the EOF technology (Enterprise Objects Framework).
It all started in 2005 with the launch of CoreData for Mac OS X 10.4 (Tiger). Though, users of iOS platforms got the opportunity to take advantage of the new system later, when the iPhone SDK 3.0 had appeared. Until this point, the developers had a hard time, they had to come up with the most optimal way to store data. Usually, the following options were used:
-
Lists of properties containing key-value pairs from different data types.
-
Serializing data and storing it in files (NSCoding).
-
Cloud data storage.
-
SQLite Relational Database (quite popular, by the way!).
We wouldn't say these methods have completely sunk into oblivion, but they’re being resorted to less and less often. It’s understandable, after all, none of them can match the usability of CoreData.
We’d like to clarify that CoreData is not the mobile application database in its traditional form, it's not even an API focused on saving data. It's the framework having the task to manage the object graph. So storing information is just one aspect of the CoreData features, which determines both its advantages and disadvantages.
In general, it’s a fairly powerful tool to process dynamic data. It’s useful in most cases when data caching is required.
But we'll talk about the pros and cons of Core Data later and in more detail.
Realm database review
Unlike SQLite (we’ve mentioned it earlier, remember?), Realm isn’t based on ORM (Object-Relational Mapping). It works on its own engine, the main differences of which are simplicity and speed. Our team has learned these (and others) benefits from our own experience.
What is the Realm database?
Realm is a cross-platform mobile database created to compete with SQLite and CoreData.
It’s a Danish startup founded in 2011 and originally called tight.db. During its existence, the project has attracted no less than 29M $ of investment.
The Realm mobile database with open source is being distributed free of charge since 2016. The company monetizes the project using the Realm Mobile Platform and the PAAS server solution.
Comparison between Core Data and Realm
So, how to start working with the database? That is, what are the fundamentals of database systems solutions?
Let’s take a look!
#1. Database Setup and Initialization
Of course, you should start with the initialization and configuration of the mobile application database. In this regard, we consider how such a process occurs when dealing with CoreData and Realm (in turn).
CoreData
To get started with the Core Data framework, you need to create a model file that contains all the entities and their attributes required during the app development process. Xcode gives us a great opportunity to perform these steps effortlessly by using a special interface.
The main advantage of CoreData is a graph diagram allowing us to establish relations between entities (one-to-one, one-to-many, etc.). And this is one of the reasons why some developers still consider Core Data to be the best mobile database.
By the way, in the case of Realm, we won't have such a chance, which leads to some inconveniences of use if there is a large database with many interconnections between entities. Sometimes you have to go into reading the code, whereas when working with Core Data, you can just open the graph diagram and see all the relations and interconnections in a matter of seconds.
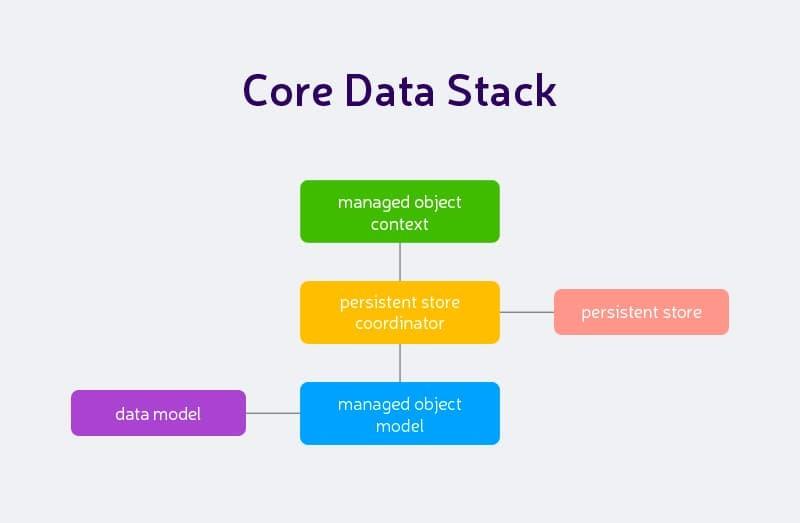
Another good news: with the release of iOS 10, Apple has pleased developers with an even greater simplification of using CoreData. Now the NSPersistentContainer object has appeared, and it undertakes the work of creating NSManagedObjectModel, NSPersistentStoreCoordinator, and NSManagedObjectContext.
The developer’s benefit is that it’s enough to initialize the persistentContainer = NSPersistentContainer (name: “ModelName”) object, and that's all: we're ready to start working with the mobile data storage solution and database files.
Realm
To get started with Realm, we need to add the framework to our project; we can install the Realm database using cocoapods.
All you have to do is add the pod 'RealmSwift' to our Podfile and execute the pod install command from the command line. Unfortunately, this will lead to an increase in the app's volume (about 13 additional megabytes).
Now, to gain access to the mobile data storage solution, just write let realm = try! Realm () and feel free to proceed to further work with the data. No more actions are required! Quickly and easily.
#2. Creating a model
Core Data
We’ve already considered the creation of a CoreData model (when we were describing the database initialization). Also, during this process, we may establish relations between entities.
After that, when we've made all the necessary settings, we need to get the corresponding class for each entity in our project for further work. We’ll achieve the goal with the built-in Codegen.
We have 3 options to create the class:
-
Manual/None. Follow the link to find out how to create a class manually. As a result, we’ll have two classes: ClassName+CoreDataClass and ClassName+CoreDataProperties.
-
Class Definition. This is the default way to create classes in Xcode (keep it in mind when dealing with the mobile database architecture in question), which implies the automatic creation of classes for working with Core Data. But remember, we won't see them explicitly in the project since they'll actually be located in the Xcode folder - Derived Data. And one more extremely important nuance! NEVER edit auto-generated files. They are controlled by Xcode and therefore will be overwritten each time during the creation of the next project's build.
-
Category/Extension. The method lies somewhere between manual and automatic class creation. Namely, the first ClassName + CoreDataProperties.swift class is located in Derived Data (we don't change it since all our changes will be overwritten automatically by default), and we may change the second ClassName + CoreDataProperties.swift class as needed.
Realm
In the case of the Realm database (iOS), the model is created in the usual way.
We add a new class that inherits from Object (a class to create models). Next, we add its properties to our model by specifying the name of the property and the data type. Below is a table with all the details:
Type |
Non-optional |
Optional |
Bool |
|
|
Int |
|
|
Float |
|
|
Double |
|
|
String |
|
|
Data |
|
|
|
Date |
|
|
Object |
|
|
List |
|
|
LinkingObjects |
|
|
#3. Creating and saving objects
As you remember, among the manipulations with the data accompanying the app operation (which leads to the need to find the best database for mobile apps), there is the necessity to create and save objects.
Let's see how the process should be carried out when it comes to CoreData and Realm custom database solutions.
Core Data
To create and save a new object in the CoreData database, you need to use persistentContainer. An example of creating a new object:
    let appDelegate = UIApplication.shared.delegate as! AppDelegate

        let context = appDelegate.persistentContainer.viewContext


        let user = NSEntityDescription.insertNewObject(forEntityName: "User", into: context) as! User

            user.firstName = "Michael"

            user.lastName = "Liptuga"

            user.bio = "Some information about me"

            user.age = 31


        try! context.save()
And that’s all you need to do!
However, the above process can be done a little differently. You'll have to write more lines of code, but such an approach would be more correct and allow you to achieve better results (which is decisive when choosing business database solutions).
We can create a separate class and name it, say, StoreManager. It’ll be built using the Singleton pattern (one copy throughout the program’s life cycle).
class StoreManager : NSObject {


    fileprivate override init(){}


    static let sharedInstance = StoreManager()


    override func copy() -> Any {

        fatalError("You are not allowed to use copy method on singleton!")

    }


    fileprivate lazy var fetchRequest: NSFetchRequest<User> = {

        let request = NSFetchRequest<User>()

        request.entity = User.entity()

        request.sortDescriptors = [NSSortDescriptor(key: "lastName", ascending: true)]

        return request

    }()


    fileprivate lazy var persistentContainer: NSPersistentContainer = {

        let container = NSPersistentContainer(name: "CoreData")

        container.viewContext.automaticallyMergesChangesFromParent = true


        container.loadPersistentStores(completionHandler: { (storeDescription, error) in

            if let error = error as NSError? {

                fatalError("Unresolved error \(error), \(error.userInfo)")

            }

        })

        return container

    }()


}
Next, we should add a method to save the data to the mobile app database.
enum ContextType {

    case main

    case background

}


    lazy var backgroundContext: NSManagedObjectContext = {

        return self.persistentContainer.newBackgroundContext()

    }()


    func saveContext(type: ContextType) {

        let context = type == .main ? persistentContainer.viewContext : backgroundContext

        if context.hasChanges {

            do {

                try context.save()

            } catch {

                let nserror = error as NSError

                fatalError("Unresolved error \(nserror), \(nserror.userInfo)")

            }

        }

    }
In this example, we store backgroundContext as a variable. That is, we'll always have only one backgroundContext which we can save with the saveContext (type:) method afterward. And we need Enum in order to indicate in which stream we want to do data saving: in the main or in the background one.
Realm
As long as the object isn't added to the Realm database, it can be used like any other object in the application. Adding and subsequent change is done only within the bounds of a transaction using the transactionWithBlock method or the beginWriteTransaction and commitWriteTransaction methods and their overloaded analogs.
To describe the model, it’s enough to create a class inherited from Object and add the necessary properties to it.
import RealmSwift


class User : Object {


    @objc dynamic var userId = 0


    @objc dynamic var firstName : String? = nil

    @objc dynamic var lastName  : String? = nil

    @objc dynamic var bio            : String? = nil


    var age = RealmOptional<Int>()


    override static func primaryKey() -> String? {

        return "userId"

    }

}
Creating an object:
        let user = User()


            user.firstName = "Michael"

            user.lastName = "Liptuga"

            user.bio = "Some information about me"

            user.age.value = 31


        StoreManager.sharedInstance.addData(object: user)
Now we’ll create a simple service responsible for adding, deleting, and retrieving records from our open-source database.
import RealmSwift


class StoreManager {


    private var   database:Realm

    static let   sharedInstance = RStoreManager()


    private init() {

        database = try! Realm()

    }


    func add (object: User)   {

        try! database.write {

            database.add(object, update: true)

        }

    }


    func deleteAll ()  {

        try!   database.write {

            database.deleteAll()

        }

    }


    func delete  (object: User)   {

        try!   database.write {

            database.delete(object)

        }

    }

}
#4. Requests
Discussing mobile and web database solutions, we cannot but mention the issue of the requests.
Suppose we need to find all the objects containing a definite value in their names. We've previously created such objects (they’re called User).
They have the firstName property which we'll use to search through our open-source in-memory database (CoreData and Realm in turn).
Core Data
First, we need to take NSManagedObjectContext and choose which Entity to get the data from. Then we have to create a database request and retrieve the data. Consider an example:
        let context = persistentContainer.viewContext

       let fetchRequest : NSFetchRequest<User> = User.fetchRequest()


       do {

           let fetchedObjects = try context.fetch(fetchRequest) as! [User]

       } catch {

           fatalError("Failed to fetch employees: \(error)")

       }
We can also create additional filtering for data by adding NSPredicate to our request (NSFetchRequest).
        let firstName = "Bob"

        fetchRequest.predicate = NSPredicate(format: "firstName == %@", firstName)
Realm
Now consider an example of creating a request in the Realm database.
We can use the StoreManager we created and add a new method to it that returns all the objects:
    func allUsers () -> Results<User> {

        let results: Results<User> = database.objects(User.self)

        return results

    }
Now we add a new method that returns filtered objects by name:
    func findUsers (by firstName : String) -> Results<User> {

        let predicate = NSPredicate(format: "firstName = %@", firstName)

        return database.objects(User.self).filter(predicate)

    }
#5. Change tracking
All the best open source databases provide us with the possibility to track changes and updates. Let's take a closer look at the problem.
Core Data
CoreData allows us to track the following changes in the database: insert / delete / move / update. And to do so, it uses the NSFetchedResultsControllerDelegate protocol.
    func controllerWillChangeContent(_ controller: NSFetchedResultsController<NSFetchRequestResult>) {

        tableView.beginUpdates()

    }


    func controller(_ controller: NSFetchedResultsController<NSFetchRequestResult>, didChange sectionInfo: NSFetchedResultsSectionInfo, atSectionIndex sectionIndex: Int, for type: NSFetchedResultsChangeType) {

        switch type {

        case .insert:

            tableView.insertSections(IndexSet(integer: sectionIndex), with: .fade)

        case .delete:

            tableView.deleteSections(IndexSet(integer: sectionIndex), with: .fade)

        case .move:

            break

        case .update:

            break

        }

    }


    func controller(_ controller: NSFetchedResultsController<NSFetchRequestResult>, didChange anObject: Any, at indexPath: IndexPath?, for type: NSFetchedResultsChangeType, newIndexPath: IndexPath?) {

        switch type {

        case .insert:

            tableView.insertRows(at: [newIndexPath!], with: .fade)

        case .delete:

            tableView.deleteRows(at: [indexPath!], with: .fade)

        case .update:

            tableView.reloadRows(at: [indexPath!], with: .fade)

        case .move:

            tableView.moveRow(at: indexPath!, to: newIndexPath!)

        }

    }


    func controllerDidChangeContent(_ controller: NSFetchedResultsController<NSFetchRequestResult>) {

        tableView.endUpdates()

    }
Realm
In the case of Realm, tracking mobile database changes occurs via notifications.
        let realm = try! Realm()

        let results = realm.objects(User.self)


        notificationToken = results.observe { [weak self] (changes: RealmCollectionChange) in

            guard let tableView = self?.tableView else { return }

            switch changes {

            case .initial:

                //Results are now populated and can be accessed without blocking the UI

                tableView.reloadData()

            case .update(_, let deletions, let insertions, let modifications):

                //Query results have changed, so apply them to the UITableView

                tableView.beginUpdates()

                tableView.insertRows(at: insertions.map({ IndexPath(row: $0, section: 0)}),

                                     with: .automatic)

                tableView.insertRows(at: deletions.map({ IndexPath(row: $0, section: 0)}),

                                     with: .automatic)

                tableView.insertRows(at: modifications.map({ IndexPath(row: $0, section: 0)}),

                                     with: .automatic)

                tableView.endUpdates()

                break

            case .error(let error):

                // An error occurred while opening the Realm file on the background worker thread

                fatalError("\(error)")

            }

        }
In order to stop tracking changes in the mobile app database, it’s enough to unsubscribe from them as follows:
notificationToken.invalidate()CoreData vs Realm: pros & cons
To understand what to choose for iOS Database and why Realm is better than CoreData (or vice versa), you need to thoroughly consider the pros and cons of both systems.
First of all, let's say that CoreData and Realm use classes based on Objective-C to create instances of real objects. CoreData takes advantage of the sqllite database by default, so you need the sqllite tools to view and edit it manually. Realm offers its own format and provides a free browser in the Mac App Store to work with the database.
But let's look at the frameworks more systematically.
#1. Database usage
Working with Realm is much easier than with CoreData.
The fact is that in order to use CoreData, you need a deep understanding of the API. In the case of Realm, everything is rather simpler.
CoreData manages objects explicitly in a ManagedObjectContext which you must save when making any changes. On the other hand, Realm saves all changes in the recording blocks themselves, and it does so immediately. Therefore, in case of app failure (or exiting the simulator), you can check the mobile database right away and see how it looks.
When using CoreData, stopping the emulator without first saving the context results in the loss of the current state of the database. Of course, when working with CoreData, you can save the context with each change, but this only adds to your work.
#2. Creation of the scheme
Working with CoreData, you build a model in Xcode that generates the classes used to create data in objects. And when dealing with Realm, you just need to inherit from Object and mark the properties you want to save as dynamic @objc. And there are a number of functions that you can override to help set up a way to save your objects, etc. (i.e., everything is quite simple).
Though, CoreData also prevails over Realm in some ways. As you remember, the Apple framework offers a visual representation of the model in XCode. And many find the process of working with one-to-many and many-to-many relations in the Xcode model editor easier than using the LinkingObjects () function in Realm.
#3. The app volume
Using CoreData has virtually no effect on our application (in this respect). However, when working with the Realm database, we must be prepared that the app volume will grow by approximately 13 megabytes (since the framework is third-party).
We’ve mentioned such a problem before if you recall.
#4. Cross-Platform Support
CoreData isn’t a cross-platform mobile database (which is so obvious: after all, we’re talking about Apple's default database).
Speaking of the second system, it has cross-platform support. In addition to the iOS Realm database, there is also a Realm database for Android and OSX. And don't change the logic when working on different platforms, just use the same models in Java, Swift, and Objective-C.
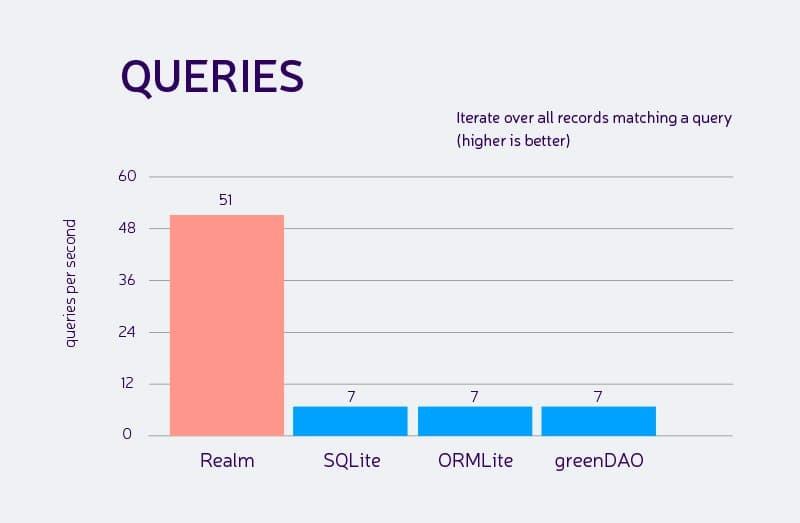
#5. Work speed
Realm uses its own engine, simple and fast. Thanks to its zero-copy design, Realm is much faster than ORM, and often faster than SQLite either.
#6. Mobile database security
We guess you understand that security in mobile database systems is a demand of the highest importance, and it should be given special attention. Working with data is always a delicate moment, user information is often personal, so its distribution is undesirable, to put it mildly. Therefore, the mobile application database you selected must guarantee data security.
Fortunately, both systems offer good data protection.
Summary
Thus, it's impossible to name unequivocally the best mobile database (is it Realm? Or is it CoreData?). Each framework has both pros and cons. The only huge Realm's advantage over CoreData is the low barrier to entry and ease of use.
Our conclusion: each project needs an individual approach, and you have to find a unique solution, which meets your specific requirements.
If you want to get more detailed advice, contact us without delay! We'll help you make the right choice of the mobile app database.